How to Splice Overlay on CapCut PC
If you’ve spent any time on editing TikTok, you’ve probably seen the term “splice overlay” thrown around without much explanation of what it actually means. Good news: it’s genuinely simple once you break it down. Really, it’s just two things happening at once: layering a clip on top of your main footage, and cutting that overlay at specific points so it lines up with the beat, the cut, or the moment you’re trying to hit. Once you’ve done it a few times, it becomes second nature.
Here’s how to actually pull it off in CapCut PC without the footage looking slapped together.
What “Splicing an Overlay” Actually Means
An overlay in CapCut is any clip, image, or effect sitting on a track above your main video. Splicing just means you’re cutting that overlay into pieces and placing those pieces at exact points in your timeline, rather than dropping one long overlay clip over the whole thing.
You’ll see this used a lot for light leaks, film grain, transition effects, reaction cutaways, and picture-in-picture inserts. The reason it looks so much more polished than a plain overlay is the timing — a well-placed cut on the overlay track feels intentional in a way that a static overlay never does.
Step 1: Get Your Main Footage on the Timeline
Open CapCut PC and start a new project. Import your primary video first — the footage that’s going to carry the video — and drag it onto the main timeline track at the bottom of the workspace. Give it a quick playback with the spacebar before you touch anything else, just to make sure it’s sitting where you want it.
Step 2: Bring In Your Overlay Clip
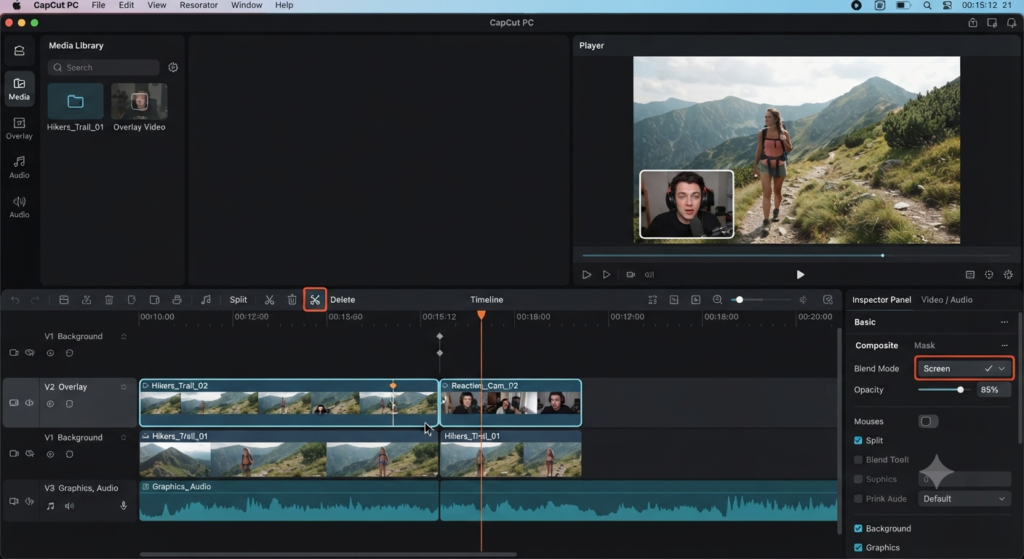
Import the second clip — the one you’re going to splice in — using the Import button or Ctrl+I. Drag it onto a track above your main video. CapCut treats any track sitting higher in the stack as an overlay track by default, so as long as it’s above your base footage, it’s set up correctly.
At this point you’ll have two clips stacked: your main footage on the bottom, your overlay sitting above it.
Step 3: Position and Size the Overlay
With the overlay clip selected, use the preview window to drag it into place and resize it by pulling the corner handles. If you’re doing picture-in-picture, you’ll usually want it tucked into a corner. If it’s a full-frame effect like a light leak or grain overlay, stretch it to cover the whole frame instead.
This is also where you’d apply a mask if you only want the overlay visible in part of the frame — useful for things like a reveal effect or a screen-within-a-screen look.
Step 4: Split the Overlay Where You Want the Cut
This is the actual “splice” part. Move your playhead to the exact frame where you want the overlay to cut, and use the Split tool (the scissors icon, or S on your keyboard) to slice the overlay clip at that point. You can now move, delete, or trim each piece independently.
Repeat this at every point where you want the overlay to start, stop, or change. A common approach is splicing the overlay so it only appears for a beat or two right on a cut in your main footage, rather than running continuously — that’s usually what gives the effect its punch.
Step 5: Blend It So It Doesn’t Look Pasted On
Once your overlay is split and positioned, select each piece and adjust:
- Opacity — dialing this down slightly usually reads more natural than 100%, especially for light leaks or texture overlays
- Blend mode — Overlay, Screen, and Lighten are the ones that come up most often for integrating light or color effects into the base footage without flattening it
- Keyframes — if you want the overlay to move, fade, or scale over its short duration, drop keyframes at the start and end of each spliced segment
Small opacity and blend adjustments do more heavy lifting here than people expect. Dial a light leak down to around 60-70% opacity with a Screen blend mode, and it reads like it was shot that way — naturally part of the footage instead of dropped on top.
Step 6: Preview, Adjust, Export
Play the sequence back a few times before exporting. Splicing usually needs a couple of passes to get the timing to actually feel synced with your main footage rather than just technically overlapping it. Once it’s sitting right, hit Export and choose your resolution, frame rate, and format as usual.
A Few Tips for Getting This Right
- Keep your tracks organized. Make sure your overlay sits on a track above your main footage — CapCut renders lower tracks underneath higher ones, so the stacking order is what makes the overlay visible.
- Keep splices deliberate and minimal. Fewer, well-placed cuts timed to your pacing usually create a cleaner, more dynamic result than a dozen tiny fragments. Start simple and add more only if the edit calls for it.
- Always set a blend mode. Choosing a blend mode instead of leaving it on Normal is what makes a spliced overlay look like a natural part of the shot rather than something dropped on top.
When to Use This
Splicing overlays earns its place in reaction videos, cinematic transitions, texture and light-leak effects, picture-in-picture tutorials, and pacing-driven social edits where you want a beat of visual interest without cutting away from your main shot entirely. For straightforward talking-head content, a clean cut works great on its own — save splicing for the moments where the extra layer genuinely adds something.